

En un post anterior vaig usar una ceràmica de tunis per mostrar els diferents passos a seguir per obtenir un model virtual a partir de fotografies mitjançant el programa image master de topcon.
In a previous post I use a pottery from Tunisia to show the different steps to obtain a virtual model from photographs using the software image master of Topcon.
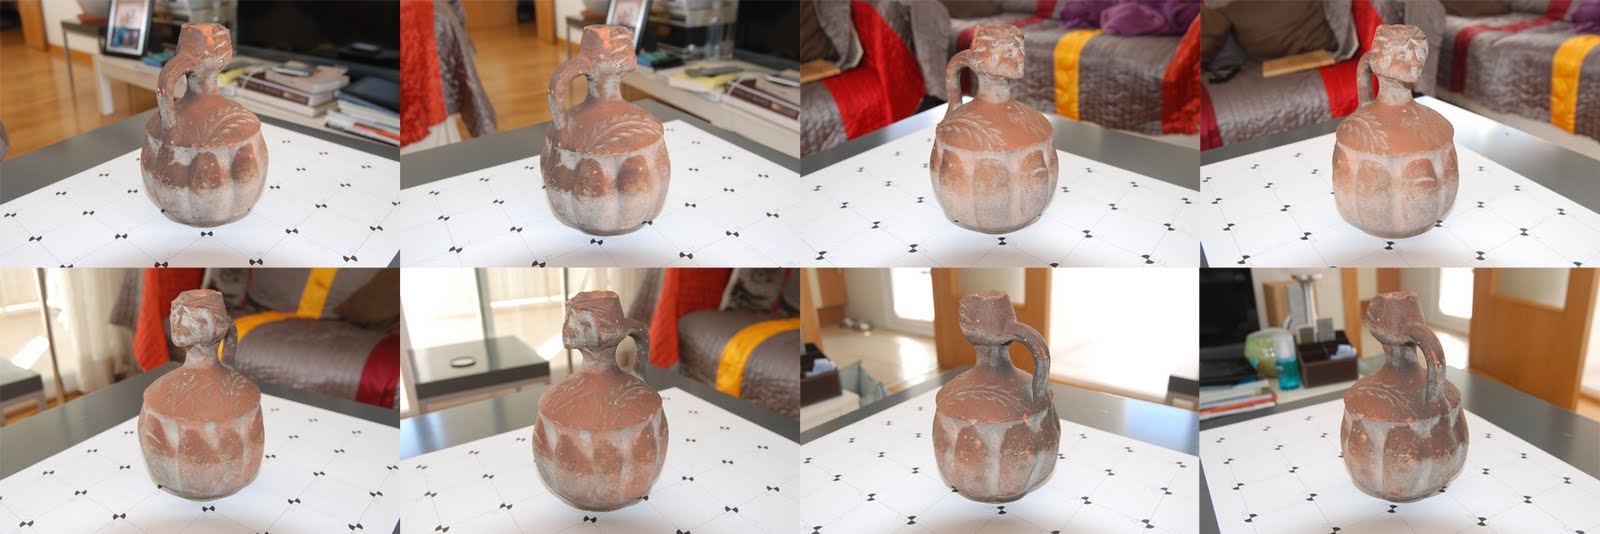
Aquesta és una nova fotogrametria el mateix objecte, però més complerta ja què he modelat també la part inferior i les zones interiors de l'ansa, especialment difícils al quedar sempre mig amagades (i el que no es veu no es pot calcular, una regla bàsica en els sitemes òptic de captura de dades).
This is a new photogrammetry of the same object, but more complete because I also modeled the bottom, and inner zones of the handle, especially difficult because remain always in part hidden (and what we can't see can't be calculated, a basic rule in optical data capture).
He usat tres sèries de 4 parells estereoscòpics, una per la part superior, una per l'inferior i una pels detalls. En total 12 parells (és a dir, 24 fotografies) que han servit per generar 14 superfícies diferents que encaixen gràcies a una xarxa de poli-línies de contorn. Els diferents colors que es veuen a les imatges distingeixen les diferents malles.
I used three series of 4 stereo pairs, one for the top four, one for the bottom and one for the details. A total of 12 pairs (24 pictures) that have served to generate 14 different areas that fit through a network of polylines. Different colors in the images distinguish different meshes.

D'altra banda he solucionat un problema força evident a la versió anterior: la visibilitat de les juntes entre les diferents textures. En aquest cas les fotografies s'han fet en un interior i amb flash, de manera que l'il·luminació de les diferents captures és molt homogènia.
I've solved a problem quite evident in the previous version: the visibility of joints between different textures. In this case the photographs were made with flash, so the lighting in the different shots is highly homogeneous.
El repte més difícil ha estat ajuntar la meitat inferior i la superior. El sistema per establir punts de referència consistia en un a plantilla sobre la que recolzava la peça, de manera que per modelar la part inferior l'havia de moure. La solució adoptada ha estat generar primer el model de la part superior i aprofitar els punts singulars de les textures de la ceràmica per marcar nous punts de control. A l'imatge següent es veuen els punts de control inicials a la base (numerats amb dues xifres: P01, P02....) i els punts de control generats sobre el model (numerats amb tres xifres: P100, P101, P102).
The most difficult challenge has been to put together the upper and lower half of the jug. The system for establishing benchmarks consisted in a template on which rested the piece, so to model the bottom it has to be moved. The solution has been to build first the top of the model and use after the singular points of the textures in the pottery to mark new control- points. In the picture below you see the control points in the initial base (numbered with two digits: P01, P02 ....) and the new control-points on the model generated (numbered with three digits: P100, P101, P102) .


Finalment, aquí tenim el resultat, un model 3D complert que pot servir, per exemple, per generar alçats i plantes amb textures perfectament definides i coherents.
Finally, here we have the result, a complete 3D model that can be used, for example, to generate elevations and plants with textures well-defined and consistent.

